
16 min read
The Essential Kayak Anchor Guide Be Still
Getting Started With Kayak Anchors
There are plenty of ways to ensure that you stay still, and by far the most popular one is using an anchor. This is pretty much the standard method to make a boat stay in one place. And, of course, it works for kayaks too. You will notice that some of the same principles that apply to boats, will apply to the kayak too, albeit on a smaller scale.
For an anchor, the weight is not the only determining factor; the size is as well. Below you will find a few types of anchors, all with their pros and cons, as well as a sample anchor setup that should give you an idea of what the system consists of. However, there is one thing that you should know before you try any of the options below. An anchor doubles as a safety device. When you’re at point A, and would like to stay there, instead of drifting towards rocky rapids, or a busy boating channel, etc., this could be essential to your safety. But, as with any safety equipment, you will want to know how to use it, so you ought to learn how to use one correctly, long before you set out on the water.
Best Overall
When you’re getting an anchor for your kayak, it’s important to get a quality kit that does everything you need it to – and the BoatTector Kit by Extreme Max is one of the best options out there. It comes with an anchor, rope and hook, as well as a marker buoy and a bag to store everything, at a price that is actually pretty reasonable.
Quick Specs

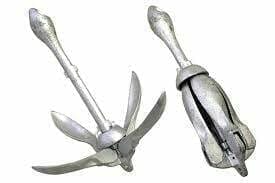
The anchor itself is excellent. It comes in at a weight of 3.5lbs, and is a folding grapnel anchor that has four shanks. Even though it’s quite versatile, it’s best if used in rocky, coral or heavily weeded bottoms. You can, however, use it in other environments, and it does work rather nice.
The rope is pretty neat, too. At 25’, it’s quite lengthy so you can use it even in deeper water. It’s made of a hollow braid polyethylene, so it’s going to last a good while and even if it rubs against rocks or something else, it won’t tear easily unlike some other ropes that you will come across. It also comes with a steel snap hook as well, which works pretty well.
The buoy is made of marine-grade foam, which is pretty good in terms of quality. Last but not least, there’s the nylon storage bag that carries everything when you don’t need it, and rounds out the entire package. It’s honestly a great pick if you want a do-it-all kit.
Runner Up
One more option is the BEST Marine & Outdoors kayak anchor, a kit that’s made to work really well in various environments. You can use it not just for a kayak, but for jet skis, paddle boards and canoes, so if you’ve got any of them, it’s a nice option.
Quick Specs

To begin with, this is a kit that comes with everything. You have an anchor, a buoy and a storage bag that carries everything. The steel anchor has four shanks and can be folded when not in use, so it makes for a pretty compact solution. It weighs 3.5lbs, so it will easily hold down your kayak without much problems. It’s primarily made to work in softer bottoms, but it does work in just about any situation if you’re in a pinch.
The rope is extra long at 40 feet, which means that this is an excellent anchor if you’re in need of one for deeper waters or you just want a longer rope. It’s a marine-grade rope, so it won’t fray or tear apart easily, which is nice in terms of durability. The buoy is pretty nice too, and BEST have made sure to make it durable, too. At the end of the rope, you’ll find a steel hook that does a great job.
Last but not least, the entire thing can be packed in the carrying storage bag. It seems like a quality option, and it’s a neat way to carry everything around.
Also Good
Those of you who have more lightweight kayaks and don’t really need a heavy anchor, the AIRHEAD SUP Anchor Kit could be the one to go for. It’s lightweight, it’s compact, and yet it manages to do a good job when you need it to.
Quick Specs

To begin with, this is a 1.5lbs anchor with four shanks. There is a sliding cap that keeps them in place when they’re folded, so you can store them away without the entire anchor taking up a lot of space. Overall, the anchor does a pretty good job. One thing to note is that you’ll want to use it in situations where you have a softer bottom, because with this weight, it might not be ideal if you can’t get it stuck well. There’s also the issue of using a heavier or larger kayak, as this anchor kit isn’t made for such situations. Oh, and we do need to mention that it comes in a bright red color, so you can easily see it at the bottom when you’re trying to set it up.
The rope comes in at 15 feet, which isn’t too long but it does the job in shallower waters and when you don’t need to take your kayak too far from the anchor point. The rope itself is decently durable, but nothing to write home about. You do have a spring loaded hook at the end, so you can easily attach it to your kayak. It’s a decent option for lightweight kayaks and SUP boards.
Types Of Anchors
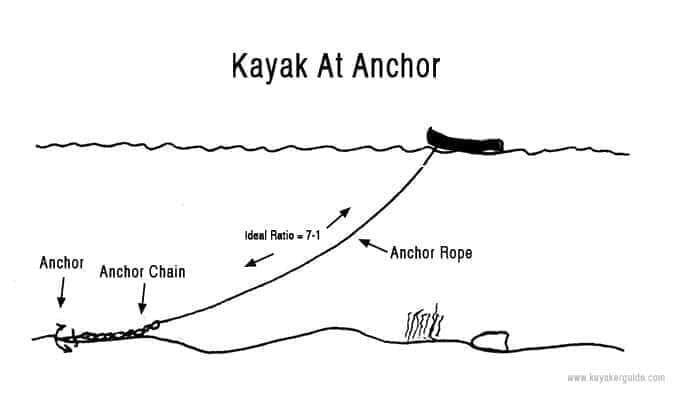
Even though many people might say that “anything heavy enough can be an anchor”, this can be a terrible mistake. If you don’t use a proper anchor, you will have it slide across the bottom of the water in adverse conditions. The most common kind of anchor you’ll run into in the kayak fishing crowds is either a 3.0lb or 1.5lb folding anchor. This is incredibly efficient. It lies on the side, grabbing the bottom. This is where a thing called scope is important. The scope is the ratio of the amount of line from the vessel to the anchor, to the water’s depth. The most commonly used ratio and the one you’ll probably run into the most often is 7:1. This means that for every 10 feet of water, you need 70 feet of line.
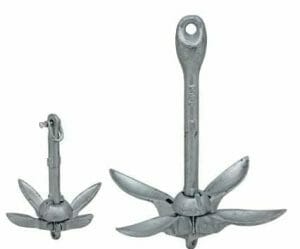
3 vs 1.5 lb kayak anchor
Even though this might seem like a lot for a kayak, if you want the anchor to be useful, you’ll need it. The anchor’s goal is to get on its side and dig in preventing or minimizing movement, and having this amount of line is crucial for this. You could also put a few feet of chain at the anchor, and tie your nylon rope to that. This little trick makes sure that the flukes of the anchor are well placed at the bottom. If you’re in a significant current, you’ll want a 3.0lb anchor. For fishing on flats, a 1.5lb model should do well.
Where To Position The Anchor? Bow, Stern Or Side?
For anchoring on the bow or stern, both have their benefits, as well as their downsides. It is entirely up to you to choose where you want it. If you anchor from the bow, you will be casting up current. You should be aware of the anchor line in front. On the other hand, if you go from the stern, you don’t have to worry about the anchor line, but at some point, the line will move in front of you, thanks to the current. Another safety tip, if you do decide to anchor from the side is to be very careful when pulling your anchor up because the instability of raising it can tip the boat quickly.
An Anchor Trolley
What happens when you want to switch from the bow to the stern, without having to get out of the kayak? This might be tricky, and that is where an incredible device known as an anchor trolley comes in. This is a rig that runs the whole length of your kayak, on one side. The anchor line is run through a ring in the rig, and what this does is it lets you move the ring, and change the placement of your anchor. All you need to do to change from the bow to the stern is to slide the ring.
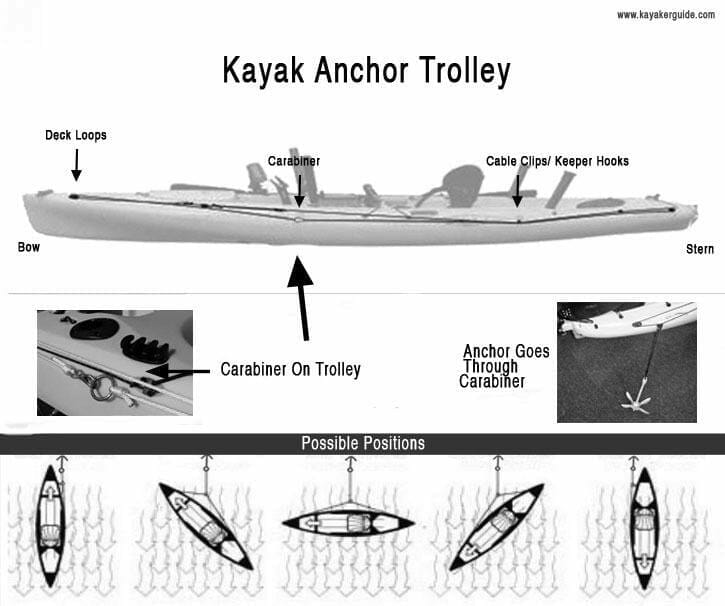
A anchor trolley is a means to not only stay in 1 place but to have the ability to keep in 1 location and face the direction which you would like to be positioned towards.
- A anchor trolley can be used so that you can fish with the wind direction at your back, across currents, or fish directly into the wind
- A anchor trolley makes it a lot easier pulling up the anchor and enables complete control for the consumer anchoring in any sort of water.
- Utilize a kayak anchor trolley method to turn your kayak around without needing to take out your anchor
- A anchor trolley makes it a lot easier pulling up the anchor and enables complete control for the consumer anchoring in any sort of water.
- Utilize a kayak anchor trolley method to turn your kayak around without needing to take out your anchor
A Stakeout Pole
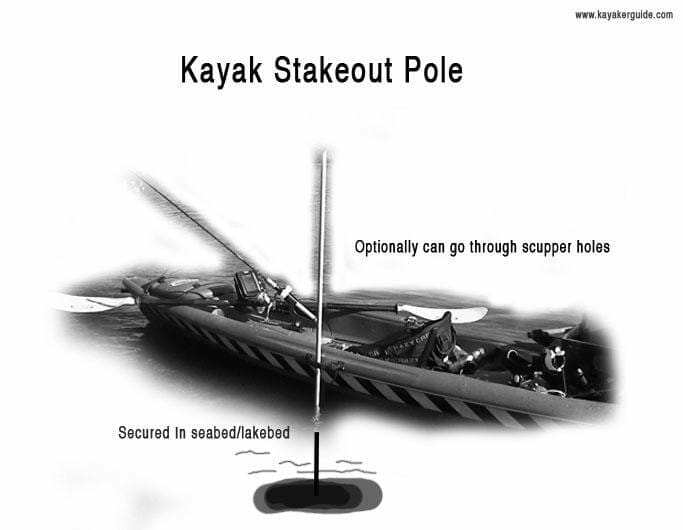
You might notice people using these, and initially, you may think that it is a pretty ridiculous idea just stabbing a pole into the muck and hoping you don't move. However, that stake out pole is pretty good in keeping you still. It simply sticks to the bottom and holds you in place. You can also use it through the scupper holes of your kayak, for added convenience. And, if you don’t want to buy one, you can make one from PVC. Any home improvement store will let you get yourself a pair for less than $10. All you need is some PVC, and you’re pretty much set to go. There are even some people who opt for broken rods, or golf clubs. The advantage is pretty much one of convenience. Deploying an anchor might take a few minutes, but staking out is a thing that takes only mere seconds. However, the disadvantage is that this trick only works in shallow water, otherwise you would need a pretty long pole, and they’re too flexible to stick when the depth increases.
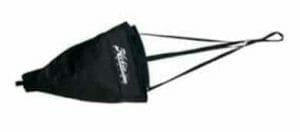
Drift Chutes Are A Thing Too
In case you just want to slow down, but not stop completely, you can use a drift chute. It is a pretty slick idea that creates additional drag and slows you down. You deploy it, and it catches water, thus creating more resistance and slowing you down. If you’re battling a large fish, and want some additional pressure, this is a great, effective way to do so. No tarpon angler launches without one. Well, not a respected one anyways. And the best thing is that once you’re done, all you need to do is pull it in, and pick it up. The water will run out, and you can throw it in storage, and you’re done.
Drag Chain
A standalone portion of the anchor which is the drag chain is very popular. It usually consists of a retractable chain usually attached to dog leash similar to your anchor system which is then hooked to 1-2 feet of top metal chain. This type of chain is popular for smallmouth fishing to get a slower drift and for hitting more spots. When paddling up and coming back down this can make a large difference.

A Sample Setup
After a while, you’ll realize that most, if not all kayak fishing, is done while at anchor. At certain places, especially those that have a high tidal range, that can be tricky. However, there are some combinations of a kayak anchor and additional tools that can always be of assistance, and work in a variety of conditions. Below, you will find one such system, as well as a pretty detailed description of how everything works and how the whole system is assembled.
We’ll begin with the anchor itself, and how it is set up. You’ll be best off using a foldable anchor – this will help a lot when you need to store it inside your kayak, as it takes up much less space. You also might want to set up some kind of a trip mechanism. This makes sure that you can free the anchor even if it does get stuck on something. There are a couple of methods, and they work as follows:
Attachment Options
Attach a chain both at the top and the bottom of the anchor. However, at the top, use a cable tie to attach it. Cut a small nick in the cable tie. When an anchor gets stuck, if you pull on the anchor tie, the cable tie will snap. This lets you pull the anchor from the bottom, which frees it in most, if not all situations. However, there are two possible tricky things here. First, the cable tie might snap too quickly, and the anchor will be continuously pulled from the bottom, thus rendering it useless. Or, the cable tie might not snap at all, and you’ll have a hard time getting the anchor out.
Attach a chain both at the top and the bottom of the anchor. However, at the top, use a cable tie to attach it. Cut a small nick in the cable tie. When an anchor gets stuck, if you pull on the anchor tie, the cable tie will snap. This lets you pull the anchor from the bottom, which frees it in most, if not all situations. However, there are two possible tricky things here. First, the cable tie might snap too quickly, and the anchor will be continuously pulled from the bottom, thus rendering it useless. Or, the cable tie might not snap at all, and you’ll have a hard time getting the anchor out.
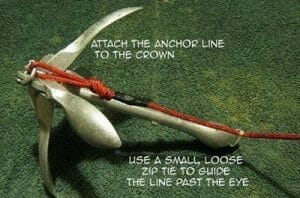
You can also use a trip link clip. This is a device that attaches your chain to the top of the anchor and releases once the tension reaches a certain point. A movable trigger can adjust that point on the clip. This has the same effect as the cable tie from the method above, but this time you can specifically adjust when it releases, and not worry about it snapping off when it shouldn’t.

Go with a bridle
A bridle is basically a small piece of rope that goes from the top of the anchor, to the bottom, and is attached using shackles. You attach the chain to it with a shackle, as well, which lets it move along the length of the bridle. There needs to be a bit of slack, but you should be careful with the amount of slack. Too much, and it won’t work. The idea is this: once your anchor is set, the chain goes to the top, and holds the anchor in place. However, if it gets stuck, all you need to do is paddle up tide, past the anchor. When you pull from this position, the shackle should slide down to the bottom, and you’ll actually pull the anchor from the bottom, effectively freeing it.
A bridle is basically a small piece of rope that goes from the top of the anchor, to the bottom, and is attached using shackles. You attach the chain to it with a shackle, as well, which lets it move along the length of the bridle. There needs to be a bit of slack, but you should be careful with the amount of slack. Too much, and it won’t work. The idea is this: once your anchor is set, the chain goes to the top, and holds the anchor in place. However, if it gets stuck, all you need to do is paddle up tide, past the anchor. When you pull from this position, the shackle should slide down to the bottom, and you’ll actually pull the anchor from the bottom, effectively freeing it.
Next, you will notice that you do not run the anchor line to the anchor, but you have a chain connecting them instead. This is a pretty critical thing, because, for one, the chain makes a huge difference to the dragging power. Apart from the fact that it adds weight, it changes the angle that the line makes with the anchor. It also smoothens out any sudden movements on the line, which might shift the anchor. For stronger tides, around three feet of 6mm chain should be sufficient. If you have weaker tides, you could get away with less.
That chain, as described, is attached to a Para cord/nylon, which is then wound onto a divers reel. The line usually comes with the reel, so that’s one less thing to worry about. You will also find a brake or ratchet on the reel, and this should lock the line, actually stopping it from coming out when it's anchored. When you want to release the line, just press the lever. However, if you’re deploying over the side of the kayak, be careful. Slowing the drum with your hand is a good idea, as the anchor drops to the seabed.
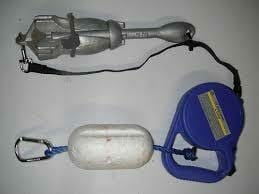
Otherwise, you can get an overrun, which is a mess. There is also a float attached to the anchor reel as well. The buoy is best chosen as one that can support the weight of the anchor, but this isn’t very important. When you’re fishing at night, you could also use some reflective 3M tape or an LED on the float, so you can find it easier.
On the kayak, you have an anchor trolley. As discussed above, it lets you move the anchor closer to the stern, or the bow. The closer you are to those ends, the more stable the kayak is. We already discussed the pros and cons of each end, so choose accordingly. You can attach the anchor to the trolley with the karabiner that runs along the length. And that is basically it, a system that works great for any kayak, and is pretty easy to both use and set up.
Anchoring The Kayak
Once you have a decent knowledge of the equipment (and if you read the article above, you do), you should know how to anchor. There are three main factors here that can affect your anchoring; those are the tide, the wind and the depth of the water. You will want your kayak to come at a certain point once you’ve dropped the anchor. For this, you will need to deploy the anchor at a certain distance, before you get to your target. The distance is the first thing you should be careful about, since the distance is directly proportional to the speed of the drift, and it continually decreases. The faster the drift, the faster the distance to your target decreases as well. If there is a faster drift, you will want to drop the anchor sooner. As far as anchor warp goes, you will need about twice the depth of water. When the distance is around twice the depth of the water, you can go ahead and drop the anchor. You should be ready for it at this point, as missing it may lead to you overshooting your target, or not even getting there.
Once you’re set, just lock the anchor line and the quick release. You should be aware, though, that this is a pretty tricky task to do. A GPS and a fish finder will be of great help if you have them, as the fish finder will tell you the exact depth of the water, while the GPS will let you drop a pin where you want to be, and calculate the distance with greater precision. However, even without them, with a little practice, you should be good. Nobody does it right the first few times, so patience and practice are essential. And, as mentioned above, in the beginning, you will want to learn this before you need it.
Summing Things Up
Anchoring a kayak is a handy thing to know. You will be able to stay still in one location, as opposed to letting the current drift you away from your fishing sweet-spot. Fishers, as well as photographers, or even bird watchers, will come to appreciate this, and investing in a good anchoring kit is a good idea. Take some time to practice anchoring, and learn your equipment. This will all come in handy once you need to anchor, and you’ll spend much less time trying to get things right.
Im not good with installing an anchor trolly.i not confident wth mMing holes in kayak!
I purchased Best marine kayak anchor for my paddle board when I would like to be stationary for longer period of time. For example when my friends and I watched Jaws on our boards in the bay.
Per a larger anchor manufacturers YouTube video, I've added about 4 feet of chain to the line.
I also recommend buying a mason twine with a winder. Replace the twine with a 4" long 1" pvc pipe and wind the anchor rope onto it.